Sign In
Upload
Manuals
Brands
Brother Manuals
Sewing Machine
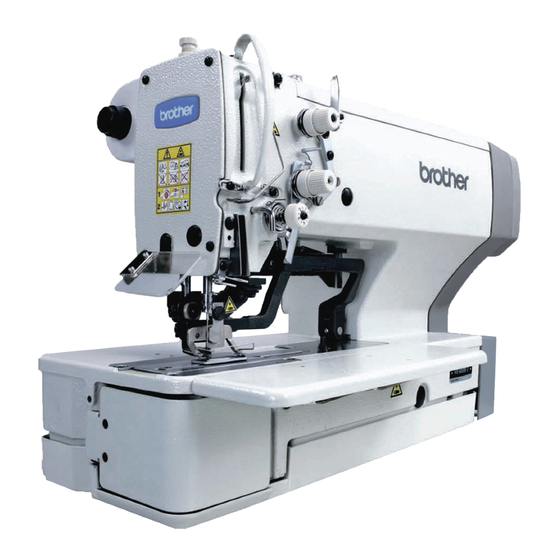
HE-800B
Brother HE-800B Manuals
Manuals and User Guides for Brother HE-800B. We have
3
Brother HE-800B manuals available for free PDF download: Service Manual, Instruction Manual, Parts Manual
Brother HE-800B Service Manual (178 pages)
Electronic Direct Drive Lockstitch Button Holer
Brand:
Brother
| Category:
Sewing Machine
| Size: 4.26 MB
Table of Contents
Table of Contents
8
1 Specifications
10
Standard Sewing Pattern List
11
2 Notes on Handling
12
3 Function Settings
13
List of Special Functions When Power Is Turned on
13
List of Advanced Functions
15
Setting Memory Switches (Advanced)
16
List of Memory Switches
17
Pedal Operation Mode Setting Method
23
Checking the Error History
25
Input Checking Method
26
Output Checking Method
29
Confirming Software Version
31
Protection Settings
32
4 Using Sd Cards
35
Notes on Handling SD Cards (Commercially Available)
35
Structure of an SD Card Folder
35
Preparation for Reading and Writing Data
36
Reading Program Data (Parameters)
37
Writing Program Data (Parameters) to an SD Memory Card
38
Reading Memory Switch Data
39
Writing Memory Switch Data to the SD Card
40
Reading Sewing Machine Data
41
Writing Sewing Machine Data to an SD Card
42
Writing Error Log Data to an SD Card
43
Updating the Control Program Version
44
5 Mechanical Descriptions
45
Needle Bar and Thread Take-Up Mechanisms
45
Upper Shaft, Lower Shaft and Rotary Hook Mechanisms
46
Needle Zigzag Mechanism
47
Presser Foot Lifter Mechanism
48
Feed Mechanism
49
Cutter Mechanism
49
Thread Breakage Detection Mechanism
50
Tension Release Mechanism
51
Upper Thread Trimmer Mechanism
52
Upper Thread Scissors Gradually Opens
54
Upper Thread Scissors Open
55
Lower Thread Trimmer Mechanism
56
Lower Thread Clamp Open at the Sewing Start
57
Open
57
6 Assembly
58
Lower Shaft and Idle Pulley Mechanisms
59
Lower Thread Trimmer Mechanism
61
Feed Mechanism
63
Threading Mechanism
66
Presser Lifter Mechanism
68
Needle Zigzag Mechanism
71
Cutter Mechanism
73
Upper Shaft and Tension Pulley Mechanisms
76
Lubrication Mechanism
78
Needle Bar and Thread Take-Up Mechanisms
84
Presser Bar Mechanism
86
Upper Thread Trimmer Mechanism
88
Thread Breakage Detector Mechanism
89
Rotary Hook Mechanism
90
Covers
91
7 Adjustment
92
Notes on Making Adjustments
92
Adjusting the Home Position
93
Switching to Home Position Adjustment Mode
93
Needle Zigzag (X) Motor Home Position
94
Feed (Y) Motor Home Position
95
Work Clamp (P) Motor Home Position
96
Adjusting the Needle Bar Height
97
Adjusting the Needle and Hook Timing
98
Adjusting the Clearance between Needle and Hook Tip
100
Adjusting the Inner Rotary Hook and Rotary Hook Holder Overlap
100
Adjusting the Work Clamp Pressure
100
Adjusting the Work Clamp Lift Amount
101
Adjusting the Work Clamp Lateral Position
102
Adjusting the Cutter Home Position Sensor Position
102
Adjusting the Cutter Installation Position
103
When Using the Special Needle Plate (Needle Plate -RB)
104
Adjusting the Cutter Installation Height
104
Adjusting the Upper Thread Trimming
105
Adjusting the Longitudinal Feed Arm Assembly Position
106
Adjusting the Trimmer Driving Arm Assembly Position
106
Adjusting the Lateral Position of the Upper Thread Scissors at the Sewing Start
107
Adjusting the Longitudinal Position of the Upper Thread Scissors
107
Adjusting the Cutting Depth of the Upper Thread Scissors
108
Adjusting the Installation Height of the Upper Thread Scissors
109
Adjusting the Upper Thread Scissors Gradual Opening Timing
110
Adjusting the Upper Thread Scissors Opening Timing
111
Adjusting the Overlapping Amount of the Upper Thread Scissors and the Work Clamp
112
Adjusting the Lower Thread Trimming
113
Adjusting the Lower Thread Trimmer Fixed Knife Engagement Amount
113
Adjusting the Lower Thread Retaining Amount
113
Adjusting the Lower Thread Clamp Opening Timing
114
Adjusting the Lower Thread Clamp Opening Amount
115
Adjusting the Bobbin Presser
115
Adjusting the Thread Breakage Detector
116
Adjusting the Thread Tension at the Tack Tension Control
117
Adjusting the Thread Tension at the Zigzag Tension Control
117
Adjusting the Upper Thread Feeding Amount
118
Adjusting the Rotary Hook Lubrication
118
Adjusting the Upper Shaft Motor Reference Position
119
Standard Settings for Treadle Depression Stroke
120
8 Installing the 3-Pedal Foot Switch (Option)
121
9 Electric Mechanism
122
Precautions at the Time of Adjustment
122
Components Inside and Outside the Control Box and in the Operation Panel
123
Fuse Explanation
124
Connectors
125
Connector Positions
125
Contact Failure
127
Troubleshooting
132
Troubleshooting Flowchart
132
Problem Solution and Measures
136
10 Table of Error Codes
151
11 Troubleshooting
157
Upper Thread Breakage
157
Skipped Stitches
158
Uneven Seams (1)
160
Uneven Seams (2)
161
Uneven Seams (3)
161
Uneven Seams (4)
162
Uneven Seams (6)
162
Uneven Seams (7)
162
Uneven Seams (8)
163
Uneven Seams (9)
163
Uneven Seams (10)
164
Upper Thread Run out
165
Unraveling of Thread Trimmed by Upper Thread Trimmer Assembly
167
Upper Thread Miss-Trimming
168
Needle Strikes Upper Thread Trimmer
169
Needle Breakage
170
Imperfect Cutter Function (Imperfect Material Cutting)
171
Cutter Does Not Return
171
Cutter and Upper Thread Trimmer Touch
172
Seam Is Cut
172
Upper Thread Miss-Winding
173
Work Clamp Is Not Raised (1)
173
Not Occur
173
Work Clamp Is Not Raised (2)
174
Lower Thread Is Not Trimmed (Pulls When Material Is Removed)
175
Feed Mechanism Does Not Move and Error Occurs
175
Needle Does Not Zigzag or Noise Occurs When Needle Zigzags
176
Sewing Machine Stops During Sewing
176
Upper Shaft Does Not Rotate as Far as the Needle up Stop Position
176
Operation Panel Display Freezes and Operation Is Not Possible
176
Advertisement
Brother HE-800B Instruction Manual (106 pages)
Instruction Manual - English
Brand:
Brother
| Category:
Sewing Machine
| Size: 2.21 MB
Table of Contents
Safety Instructions
3
Maintenance and Inspection
5
Table of Contents
8
1 Names of Major Parts
10
2 Specifications
11
Standard Sewing Pattern List
12
3 Installation
13
Table Processing Diagram
13
Installing the Control Box
14
Installing the Flange Nut
15
Installing the Bed Base
15
Installing the Machine Head
16
Installing the Head Rest
16
Installing the Operation Panel
17
Installing the Oil Stopper Plate
18
Connecting the Cords
18
Connecting the Ground Wire
21
Installing the Treadle Connecting Rod
22
Installing the Cotton Stand
23
Installing the Eye Guard
23
Lubrication
24
Lubricating the Bed Base
24
Lubricating the Arm
24
Lubricating the Rotary Hook
25
Connecting the Power Cord
25
Checking the Safety Switch
28
Installing the Motor Cover
28
Installing the Auxiliary Table
29
4 Preparation before Sewing
30
Installing the Needle
30
Threading the Upper Thread
31
Winding the Lower Thread
33
Installing the Bobbin Case
34
Thread Tension
35
Lower Thread Tension
35
Upper Thread Tension
36
Thread Take-Up Spring Height
37
Thread Take-Up Spring Tension
37
Adjusting Arm Thread Guide
37
5 Using the Sewing Machine (Operation Panel: Basic Operation)
38
Name and Function of each Operation Panel Item
38
Starting the Sewing Machine
40
Operating the Treadle
41
Program Setting Method
42
Parameter List
44
Setting the Length of the Hole
50
Buttonhole Sewing Size
50
Main Restrictions When Setting Parameters
50
Rear Tack Vector Shape Programs
51
Underlay Programs
52
Cutter Operation
53
Copying Programs
54
6 Using the Sewing Machine (Sewing Operation)
56
Automatic Sewing (Automatic Sewing Mode)
56
Test Feeding Mode
57
Using the STOP Switch
59
Pausing Sewing During Automatic Sewing
59
7 Using the Sewing Machine (Operation Panel: Advanced Operation)
61
Using Cycle Programs
61
Setting Memory Switches
64
List of Memory Switch Settings
65
Resetting the Data (Initialization)
66
Changing the Lower Thread Counter Setting
67
Changing the Production Counter Setting
68
Displaying the Help Screen
69
8 Cleaning
70
Draining the Oil
71
Cleaning the Control Box Air Inlet Port
71
Cleaning the Eye Guard
72
Checking the Needle
72
Cleaning the Length Feed Plate
72
9 Standard Adjustments
73
Adjusting the Needle Bar Height
73
Adjusting the Needle and Hook Timing
74
Adjusting the Clearance between Needle and Hook Tip
75
Adjusting the Inner Rotary Hook and Rotary Hook Holder Overlap
75
Adjusting the Work Clamp Pressure
75
Adjusting the Cutter Installation
76
Adjusting the Installation Height of the Upper Thread Trimmer
77
Adjusting the Upper Thread Trimmer Opening Timing
78
Adjusting the Lower Thread Clamp Timing
79
Adjusting the Bobbin Presser
79
10 Table of Error Codes
80
11 Troubleshooting
86
Upper Thread Breakage
86
Skipped Stitches
87
Uneven Seams
89
At the Sewing Start
89
Lower Thread Is Lifted up at the Sewing Start
89
Lower Thread Is Lifted up at the Sewing Start
90
Uneven Seams
90
Seam Lifts up at the Sewing Start
90
Uneven Seams
91
Uneven Sewing Pitch at the Sewing Start
91
Poor Rounding of Seam
91
Around Rear Tack or Front Tack
91
Loose Thread End at End Backtack
91
Uneven Seams
92
Thread Sticking out at End Backtack
92
Sticking in Needle Plate
92
Uneven Seams
93
All Stitches
93
Upper Thread Run out
94
Unraveling of Thread Trimmed by Upper Thread Trimmer Assembly
96
Upper Thread Miss-Trimming
97
Needle Strikes Upper Thread Trimmer
98
Needle Breakage
99
Imperfect Cutter Function (Imperfect Material Cutting)
100
Cutter Does Not Return
100
Cutter and Upper Thread Trimmer Touch
101
Seam Is Cut
101
Upper Thread Miss-Winding
102
Work Clamp Is Not Raised
102
Pulse Motor Stepping Sound Cannot be Heard
102
Work Clamp Is Not Raised
103
Pulse Motor Stepping Sound Can be Heard
103
Lower Thread Is Not Trimmed (Pulls When Material Is Removed)
104
Feed Mechanism Does Not Operate or Motor Is out of Step
104
Needle Does Not Zigzag or Noise Occurs When Needle Zigzags
105
Sewing Machine Stops During Sewing
105
Upper Shaft Does Not Rotate as Far as the Needle up Stop Position
105
Operation Panel Display Freezes and Operation Is Not Possible
105
Instruction Manual
106
Brother HE-800B Parts Manual (68 pages)
Electronic direct drive lockstitch button holer
Brand:
Brother
| Category:
Sewing Machine
| Size: 4.37 MB
Table of Contents
Table of Contents
3
Machine Body
4
Needle Bar and Thread Take-Up Mechanism
6
Upper Shaft Mechanism
8
Zigzag Mechanism
10
Emergency Stop Mechanism
12
Presser Foot Mechanism
14
Feed Mechanism
16
Cutter Mechanism
18
Thread Breakage Detector Mechanism
20
Rotary Hook Mechanism
22
Lower Shaft Mechanism
24
Lubrication
26
Threading Mechanism
30
Bobbin Winder Mechanism
34
Upper Thread Trimmer Mechanism
36
Lower Thread Trimmer Mechanism
38
S1. Control Box
42
S2. Control Box
44
Power Supply Equipment
46
Operation Panel
48
Motor Mechanism
50
Attachment Set (Option Parts)
52
Accessories
54
Ga1. Gauge Parts List
58
Ga2. Gauge Parts List
59
Ga3. Gauge Parts List
60
Wa. Warning Labels
61
Index
63
Advertisement
Advertisement
Related Products
Brother HE-800A
Brother HE-8000
Brother HE-800C
Brother HE-240
Brother HE1
Brother HE-120PKG
Brother HE 120
Brother HS-1000
Brother HQ18
Brother HAK 100
Brother Categories
Sewing Machine
All in One Printer
Printer
Label Maker
Fax Machine
More Brother Manuals
Login
Sign In
OR
Sign in with Facebook
Sign in with Google
Upload manual
Upload from disk
Upload from URL